Crater Node
- Category: Generators
- Edition: All editions
- Output type: Height (signed) and four masks
- Typical place in a graph: the first node of a crater biome, followed by erosion and texturing
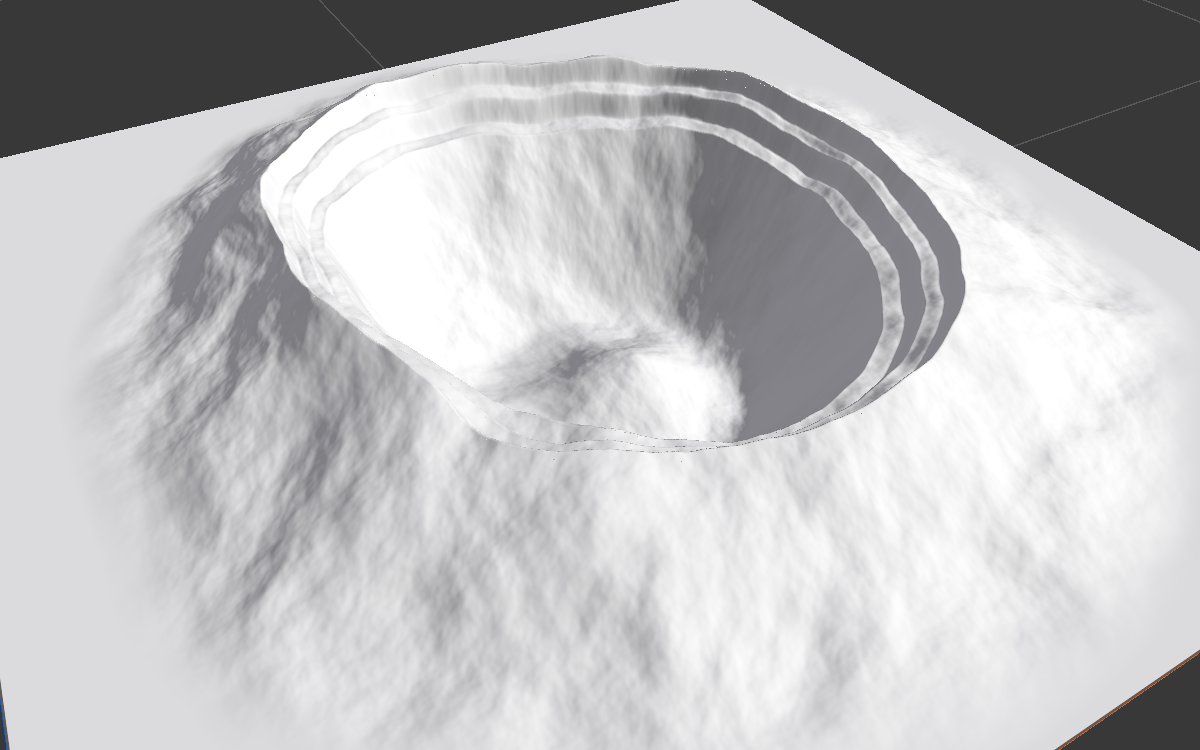
Crater builds a complete impact crater in one node: a raised rim, a bowl that digs below the surrounding ground, terraces stepping down the inner wall, and a small rise in the middle of the floor. The outline is gently bent so it never looks like a perfect circle, and a light surface roughness gives erosion something to work on. It is fast, with no simulation. Four extra outputs mark the rim, the inner wall, the floor and the outer slope for texturing.
When to use it
- A meteor or impact crater, a caldera, a sinkhole or a quarry pit as the main landform of a biome.
- A field of craters, as a stamp for Splatter 2 (recipe
moon-surface). - Masks for texturing a crater: bare rock on the rim, rubble on the wall, sediment or a lake on the floor, ejecta outside.
- Not for: a volcano with a cone and a vent (use Volcano); a plain round pit or ring without the crater details (use Shape Torus or Radial Gradient).
Inputs
None.
Outputs
| Slot | Type | What it holds |
|---|---|---|
| Height | Mask (signed) | The crater's height relative to the surrounding ground: above 0 for the rim and outer slope, below 0 for the bowl. It only digs into the ground when the biome's Blending > Height Map is set to Raise (see the warning below). |
| Rim | Mask | A band over the crest of the rim, for exposed rock or scorched ground. |
| Wall | Mask | The inner wall with its terraces, from the rim down to the floor, for rock or rubble. |
| Floor | Mask | The floor of the bowl, including the central rise, for sediment, lava or a lake. |
| Outer Slope | Mask | The slope outside the rim down to the foot, for ejecta and debris. Nothing beyond the foot. |
The masks follow the bent outline and scale with Rim Size. Masks that nothing reads are not drawn, so they cost nothing unless connected.
Properties
| Property | Default | Range | What it does |
|---|---|---|---|
| Seed | Random | Any integer | Changes how the outline bends and the surface roughness. It is combined with the biome's seed. |
| Rim Height | 80 | 0 and up, meters | Height of the rim above the surrounding ground. |
| Floor Depth | 140 | 0 and up, meters | Depth of the floor below the surrounding ground. It digs in only with the biome's height blend set to Raise. |
| Size | 0.95 | 0.1 to 1 | Diameter of the foot (where the outer slope meets the ground), as a fraction of the biome width. |
| Rim Size | 0.574 | 0.1 to 0.9 | Diameter of the rim, as a fraction of the foot. Smaller values make a smaller bowl on a broad mound; larger values make a wide bowl with a short outer slope. |
| Terrace Count | 2 | 0 to 2 | Number of terrace steps on the inner wall. 0 gives a smooth bowl. |
| Central Rise | 0.28 | 0 to 1 | Height of the mound in the middle of the floor, as a fraction of Floor Depth. |
| Roughness | 15 | 0 and up, meters | Height of a noise on the surface. It makes the crater look natural and, more importantly, gives erosion something to work on: a perfectly smooth surface erodes in regular, comb like patterns. |
| Irregularity | 0.082 | 0 to 1 | How far the outline bends away from a circle, as a fraction of the biome width. Higher values need a smaller Size to keep the crater inside the biome. |
Common properties
| Property | What it does |
|---|---|
| Id | The node's unique name in this graph, shown for reference. You cannot edit it. Scripts and the AI workflow CLI use it to find the node. |
| Resolution | How detailed this node's result is, in texels across the biome. Crater has no input, so Relative To Main Input (default) and Relative To Graph both follow the biome's Canvas Resolution, times the multiplier below. Absolute sets an exact size. The terrace edges and roughness need enough resolution to stay crisp. Absolute is limited to 32 to 512 in Vista Personal and 32 to 4096 in Vista Indie and Pro. |
| Split Execution | Lets this node run over several frames so the editor stays responsive during long generations. It only works when Allow Split Execution is on in the graph settings. This node finishes in one step, so splitting only adds a short pause around it; leave it off. |
| Bypass | Skips the node. It has no input to pass through, so nothing comes out, and the nodes after it receive empty, flat ground. |
Examples
All examples show the Height output as terrain in the graph editor's 3D viewport, on a 1024 × 1024 m biome with a terrain height of 400 m. Seed 128; values not listed are the defaults. The default heights are meant for a biome of about 2 km, so on this 1 km biome the walls are steeper than they would be in a real crater biome.
Default settings
A raised rim, two terraces stepping down the inner wall, a floor 140 m below the ground with a small rise in the middle, and a rough outer slope.
Variations
| No terraces | Strong central rise |
|---|---|
 |
 |
| Terrace Count 0: a smooth bowl. | Central Rise 0.8: a tall central peak, as in large impact craters. |
| Irregular outline | No roughness |
 |
 |
| Irregularity 0.3 and Size 0.75: an older, broken looking crater. | Roughness 0: clean, smooth surfaces. Erosion on these makes regular patterns, so keep some roughness. |
Texturing masks

The four masks together: Outer Slope (green), Rim (red), Wall (orange) and Floor (blue). They meet without gaps, so they can be used directly as weights for four texture layers.
| Rim | Wall | Floor | Outer Slope |
|---|---|---|---|
 |
 |
 |
 |
Recipes
- Crater biome: Crater → Hydraulic Erosion 2 → Height Output, with the biome's height blend set to Raise and the surrounding ground higher than Floor Depth. The AI workflow recipe
crater-base-shapeexplains this route and the alternative built from basic nodes. - Crater texturing: Rim → bare rock layer, Wall → rubble layer, Floor → sediment layer, Outer Slope → ejecta layer, all in Weight Blend or as weights of Texture Output nodes.
- Field of craters: Crater Height as the stamp of Splatter 2, fed by Scatter with Spread Count 0. Recipe
moon-surface.
Warning
Height is signed. Set the biome's Blending > Height Map to Raise so the bowl digs into the ground below it. The bowl can only go as deep as the ground allows: on ground lower than Floor Depth, it bottoms out at the terrain's floor. Raise the ground or lower Floor Depth.
Note
The heights are in meters and do not change with the biome size, while the outline does. The defaults suit a biome of about 2 km; on a much smaller biome, lower Rim Height, Floor Depth and Roughness together, or the walls get very steep.
Note
Roughness adds to the heights, so the deepest and highest points go a little past Floor Depth and Rim Height (about 150 m instead of 140 m at the defaults).
Tip
In the 2D viewport the crater looks almost black, because most of it is at or below 0. Check it in the 3D viewport, or look at its masks.
Performance
Fast: two noise passes for the outline and roughness and one pass per output, all on the GPU. Masks that nothing reads are skipped.
Related nodes
- Volcano: a volcano cone with a vent and lava masks.
- Shape: a plain Torus or Cone to build your own crater.
- Splatter 2: stamp many craters.
- Hydraulic Erosion 2, Thermal Erosion 3: weather the crater.
For AI agents
- Type name:
CraterNode. Outputs: Height =100(signed), Rim =101, Wall =102, Floor =103, Outer Slope =104. No inputs. - Properties:
seed(random on creation),rimHeight,floorDepth,roughness(meters),size(0.1 to 1),rimSize(0.1 to 0.9),terraceCount(0 to 2),centralRise(0 to 1),irregularity(0 to 1). - Measured at the defaults on a 400 m terrain: Height from about -0.38 to 0.21 (-153 m to +85 m).
- Biome setting:
vista_lpb_settings_set --settings '{"blendOptions":{"heightMapBlendMode":"Raise"}}'. - Preview a mask without connecting it:
vista_graphitor_capture --target viewport2d --slot 102.